Showing posts with label BLOGGER TIPS. Show all posts

Friday, 31 May 2013

Add Google Sitemap to your Blogger Blog

Add Google Sitemap to your Blogger Blog

By Adding Google sitemap to your blogger blog, no need to ping your blog when ever you update your blogger blog. It is easy to add Google sitemap to blogger blogs. First generate your blogger site map from trusted sites or just replace yourblogname with your blogger blog Url in the code on step 4.
fallow below steps to add a google sitemap to your blogger blog.

  1. Go to blogger dashboard
  2. Click on settings and click on search preferences
  3. Under crawlers and indexing click edit custom robots.txt
  4. Paste below code in custom robots.txt box

User-agent: *
Disallow: /search
Allow: /
Sitemap: http://yourblogname.blogspot.com/atom.xml?redirect=false&start-index=1&max-results=500
Sitemap: http://yourblogname.blogspot.com/atom.xml?redirect=false&start-index=501&max-results=500
Sitemap: http://yourblogname.blogspot.com/atom.xml?redirect=false&start-index=1001&max-results=500
Sitemap: http://yourblogname.blogspot.com/atom.xml?redirect=false&start-index=1501&max-results=500
Sitemap: http://yourblogname.blogspot.com/atom.xml?redirect=false&start-index=2001&max-results=500
Sitemap: http://yourblogname.blogspot.com/atom.xml?redirect=false&start-index=2501&max-results=500
Sitemap: http://yourblogname.blogspot.com/atom.xml?redirect=false&start-index=3001&max-results=500


     5. Change blue part of code with your blogger name.
     6. Click on save changes.

Thursday, 29 November 2012

Remove Newer and Older Post Links from Blogger

Remove Newer and Older Post Links from Blogger
  1. Login to Blogger with your ID.
  2. Click Template.
  3. Click tab Edit HTML > Proceed >
  4. Check Expand Widget Templates Box
  5. Find the Following Part of Code 
#blog-pager-newer-link {
float: left;
}
#blog-pager-older-link {
float: right;
}
#blog-pager {
text-align: center;
}

5. Then REPLACE it with.

#blog-pager-newer-link {
display: none;
}
#blog-pager-older-link {
display: none;
}
#blog-pager {
display: none;
}

6. Save Template  & Check For Changes !

Thursday, 22 November 2012

Disable Right Click On Blogger

Disable Right Click On Blogger

1. Login to Blogger with your ID.
2. Click Template.
3. Click tab Edit HTML > Proceed >
4. Check Expand Widget Templates Box
5. Find the following code

<body>

6. Replace the code you found with the following code:

<body oncontextmenu="return false">

7. Save Template & See the Result.

Sunday, 18 November 2012

Redirect 404 Errors/Unavailable Blogger Post Page to Homepage or another URL

Redirect 404 Errors/Unavailable Blogger Post Page to Homepage or another URL

1. Login to Blogger with your ID.
2. Click Template.
3. Click tab Edit HTML > Proceed >
4. Click on Expand Widget Templates
5. Find & Past Below Code After <data:navMessage/> OR <b:if cond='data:navMessage'>

<b:if cond='data:navMessage == &quot;Sorry, the page you were looking for in this blog does not exist.&quot;'>
    &lt;script language=&quot;javascript&quot;&gt;
    window.location=&#39;<data:blog.homepageUrl/>&#39;;
    &lt;/script&gt;
    </b:if>

6. Now save your template and refresh any of your 404 error/unavailable blogger page to check if this script is working or not.
7. If you do not want too redirect your  404 error/unavailable blogger page to your homepage instead you want to redirect to some another website than just replace the <data:blog.homepageUrl/> line in above code with http://www.your-url.com and that’s it will start redirecting your error pages to that domain name.

Wednesday, 14 November 2012

Remove Attribution Widget from Blogger

REMOVE ATTRIBUTION WIDGET FROM BLOGGER


 Method 1

1. Login to Blogger with your ID.
2. Click Template.
3. Click tab Edit HTML > Proceed >
4. Check Expand Widget Templates Box
5. Find & Past Below Code Just Before  ]]></b:skin>

#Attribution1{display:none}

6. Save Template

Method 2

1. Login to Blogger with your ID.
2. Click Template.
3. Click tab Edit HTML > Proceed >
4. Check Expand Widget Templates Box
5. Find Below Code

<b:widget id='Attribution1' locked='true' title='' type='Attribution'>

6. Once you find  the attribution code, replace locked='true' with locked='false'
7. Save Template.

Now attribution gadget is unlocked and it can be removed from Blogger Layout.

Sunday, 11 November 2012

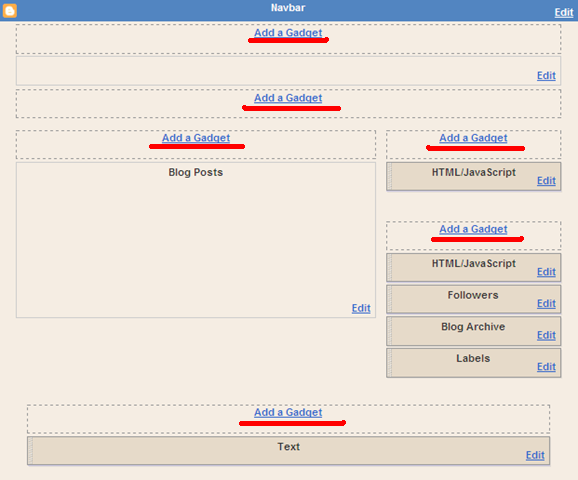
Enable All Add A Gadget/Page Element in Blogger Layout

Enable All Add a Gadget Page Element in Blogger Layout

1. Login to Blogger with your ID.
2. Click Template.
3. Click tab Edit HTML > Proceed >
4. Check Expand Widget Templates Box 
5. Find for the word showaddelement and change showaddelement='no' to showaddelement='yes'
6. After Make Changes Find Another Word maxwidgets and change maxwidgets='1' to maxwidgets='2'
7. Save Template & Check Your Blog Layout For Changes.

Saturday, 10 November 2012

Show Only Post Title on Blogger Homepage

SHOW ONLY POST TITLE ON BLOGGER HOMEPAGE
  1. Login to Blogger with your ID.
  2. Click Template.
  3. Click tab Edit HTML > Proceed >
  4. Find & Past Below Code After ]]></b:skin>
<style type='text/css'>
     <b:if cond='data:blog.pageType != "item"'>
     <b:if cond='data:blog.pageType != "static_page"'>
     .post-body{display:none;}
     </b:if>
     </b:if>
     </style>

5. Save Template & See the Result.

If not work 1st trick on your BLOG. please try another:

1. Login to Blogger with your ID.
2. Click Template.
3. Click tab Edit HTML > Proceed >
4. Check Expand Widget Templates Box
5. Find the following code

<b:include data='post' name='post'/>

6. Replace the code you found with the following code:

<!--Post Titles Only Trick-->
<b:if cond='data:blog.pageType != "item"'>
<h3 class='title-only'><a expr:href='data:post.url'><data:post.title/></a></h3>
<b:else/>
<b:include data='post' name='post'/>
</b:if>
<!--www.musicrootz.com-->

7. Save Template & See the Result.

Friday, 9 November 2012

Remove "Showing Post with Label...Show All Posts" from above Blogger Post Title

REMOVE SHOWING POST WITH LABEL...SHOW ALL POSTS FROM ABOVE BLOGGER POST TITLE
  1. Login to Blogger with your ID.
  2. Click Template.
  3. Click tab Edit HTML > Proceed >
  4. Check Expand Widget Templates Box
  5. Find the Following Part of Code 
<b:includable id='status-message'>
<b:if cond='data:navMessage'>
<div class='status-msg-wrap'>
<div class='status-msg-body'>
<data:navMessage/>
</div>
<div class='status-msg-border'>
<div class='status-msg-bg'>
<div class='status-msg-hidden'><data:navMessage/></div>
</div>
</div>
</div>
<div style='clear: both;'/>
</b:if>
</b:includable>

5. Then REPLACE it with.

<b:includable id='status-message'>
<b:if cond='data:navMessage'>
<div>
</div>
<div style='clear: both;'/>
</b:if>
</b:includable>

6. Save Template  & Check For Changes !

Monday, 5 November 2012

Use Blogger to Upload Your JavaScript (.Js) Files

Use Blogger to Upload your Javascript (.js) files

  1. First you need to copy the Javascript (.js) link from template & download all your javascript (.js) files those hosted anywhere. 
  2. Now, open javascript (.js) file with Wordpad (not notepad) and copy that code. 
  3. Login to Blogger with your ID. 
  4. Click Template. 
  5. Click tab Edit HTML > Proceed > 
  6. Find & Past Below Code After <head> OR <b:include data='blog' name='all-head-content'/>
<script type='text/javascript'>

//<![CDATA[

  REPLACE HERE STEP 2 COPIED JAVASCRIPT CODE

//]]>

</script>

5.  Replace marked text with blue color in above code with javascript (.js) code. (copied in step 2)
6.  Save Template.
Note: Use above process or script every time for each javascript.

Benefits of this trick: No file size limitations, No bandwith limitations, Super fast page loading (because Javascript (.js) files are stored in blogger itself)

Sunday, 4 November 2012

Create Auto Refresh Blogger Blog

CREATE AUTO REFRESH BLOGGER BLOG

1. Login to Blogger with your ID.
2. Click Template.
3. Click tab Edit HTML > Proceed >
4. Find & Past Below Code After <head>

<meta content='300' http-equiv='refresh'/>

5. Mark with blue color in above code means, the blog will refresh in every 300 seconds. As you want change the number 300  to refresh automatically (in seconds).

6. Save Template and it's ready to refresh!

OR

Click Below Button for Add BLOGGER AUTO REFRESH script to Your Blogger.

Monday, 29 October 2012

Fix Blogger Gadget/Widget Display Only On Home Page or Specific

Fix Blogger Gadget/Widget Display Only On Home Page or Specific
SET A GADGET ONLY APPEAR ON THE HOME PAGE ONLY FOLLOW BELOW STEPS:

1. Login to Blogger with your ID & Find Here Your Widget ID
2. Go to Blogger Dashboard.

3. Click Template.
4. Edit HTML >> Proceed >>
5. Find Your Widget ID that you Noted in Step 1 (don't click expand widget templates) then you got it below result after search.


<b:widget id='Text1' locked='false' title='Test gadget' type='Text'/>

6. Now Click on the Expand Widget Templates check box. After check the expanded template, find the widget name again. This time it will look a bit longer like below.

<b:widget id='Text1' locked='false' title='Test gadget' type='Text'>
<b:includable id='main'>
  <!-- only display title if it's non-empty -->
  <b:if cond='data:title != ""'>
    <h2 class='title'><data:title/></h2>
  </b:if>
  <div class='widget-content'>
    <data:content/>
  </div>

  <b:include name='quickedit'/>
</b:includable>
</b:widget>

7. Then add conditional formatting in above code.
Example:

<b:widget id='Text1' locked='false' title='Test gadget' type='Text'>
<b:includable id='main'>
<b:if cond='data:blog.url == data:blog.homepageUrl'>
  <!-- only display title if it's non-empty -->
  <b:if cond='data:title != ""'>
    <h2 class='title'><data:title/></h2>
  </b:if>
  <div class='widget-content'>
    <data:content/>
  </div>
  <b:include name='quickedit'/>
</b:if>
</b:includable>
</b:widget>

8. After Make Change save Your Template & check that the widget visibility.

DISPLAY A GADGET ONLY ON A SPECIFIC POST OR PAGE:
Follow exactly the same approach as above. But instead of

<b:if cond="data:blog.url == data:blog.homepageUrl">

Make the conditional statement based on something else. This can be a different condition, or a specific page URL. For example to display a gadget only on a specific page, use this code, and put the address of the page instead of POST-URL:

<b:if cond="data:blog.url == "POST-URL"">>

To display a gadget on every page except a specifc one, replace the double equals signs (==) with the HTML code for not, which is an exclamation mark followed by an equal sign (!=). For example:

<b:if cond="data:blog.url != data:blog.homepageUrl">

Get Blogger Widget/Gadget Id

After Login Blogger >> Go to Blogger Dashboard >> Layout >> Then Which Gadget ID Require Click the Edit Option on the Widget/Gadget >> Once the Widget/Gadget Popup Window Open you should see something like below Image.


>> Now Found Here Selected Gadget/Widget ID = Text1
Note: This is case sensitive so copy it just as you see it. 

Sunday, 7 October 2012

Redirect a Blog to another Blog Automatically

Redirect a Blog to another Blog Automatically

1. Login to Blogger with your ID.
2. Click Template.
3. Click tab Edit HTML > Proceed >
4. Find & Past Below Code After <b:include data='blog' name='all-head-content'/> or <head>

<meta content='5;url=http:// blogurl.blogspot.com ' http-equiv='refresh'/>

5. Change 5 to another number. It represents the seconds needed to redirect/refresh the page to another website/page/domain. Putting 0 means immediate refresh and the viewer won't be able to see the landing website/page/domain.
6. Set the target website/page/domain, change http:// blogurl.blogspot.com to your desired target website/page/domain.
7. Save Template and it's ready to redirect/refresh!

Saturday, 6 October 2012

Fixed Number of Posts on Blogger Label Search Pages

FIX NUMBER OF POSTS ON BLOGGER LABEL SEARCH PAGE

1. Login to Blogger with your ID.
2. Click Template.
3. Click tab Edit HTML > Proceed > Select Expand Widget Templates.
4. Find Code expr:href='data:label.url' 
5. You may find the above code at more than one places. So replace the above code with following code at all the places.

expr:href='data:label.url + "?max-results=10"'

6. You can change max-results=10 for the number of posts you want to display on label search page.
7. Click SAVE TEMPLATE buttons, and wait until your template saved. Now check blogger.
8. You can manually set label links in sidebar/menu as - http://musicrootz.blogspot.com/search/label/YOUTUBE?max-results=10 

Another Way 

1. Login to Blogger with your ID.
2. Click Template.
3. Click tab Edit HTML > Proceed > Select Expand Widget Templates.
4. Find Below Code

<a expr:dir='data:blog.languageDirection' expr:href='data:label.url'>
<data:label.name/>
</a>
</b:if>
<span dir='ltr'>(<data:label.count/>)</span>

5. Then Replace It With Below Code

<a expr:dir='data:blog.languageDirection' expr:href='data:label.url + "?max-results=10"'>
<data:label.name/>
</a>
</b:if>
<span dir='ltr'>(<data:label.count/>)</span>

6. You can change max-results=10 for the number of posts you want to display on label search page.
7. Click SAVE TEMPLATE buttons, and wait until your template saved. Now check blogger.

Thursday, 4 October 2012

Fix Adsense Ads Only On Homepage or Post Page of Blogger

Fix Adsense Ads Only On Homepage or Post Page of Blogger
1. Login to Blogger with your ID
2. Go to Blogger Dashboard.

3. Click Template.
4. Edit HTML >> Proceed >>
5.
As Required Follow Below Steps 

If You Want to Show Ads Only On Home Page then Change Your Adsense Code Like Below Code.

<b:if cond='data:blog.pageType != &quot;item&quot;'> YOUR AD CODE HERE </b:if>

If You Want to Show Ads Only On Post Page then Change Your Adsense Code Like Below Code.

<b:if cond='data:blog.url != data:blog.homepageUrl'> YOUR AD CODE HERE </b:if>

Replace Your Adsense Code Where Middle Of The Code Mark With Blue Color.

Wednesday, 3 October 2012

Customize Blogger Newer, Older & Home Navigation Links

Customize Blogger Newer, Older & Home Navigation Links

1. Login to Blogger with your ID.
2. Click Template.
3. Click tab Edit HTML > Proceed > Select Expand Widget Templates.
4. Change Older Posts Link Find Code <data:olderPageTitle/>   and Replace with Below Code.

<img src='https://lh6.googleusercontent.com/-Cr0GEXoCDb8/UGWw2m1qjcI/AAAAAAAACWI/FnkAA2URnno/s48/prev.png' style='border: 0 none;vertical-align: middle;'/>

5. Change Newer Posts Link Find Code <data:newerPageTitle/>  and Replace with Below Code.

<img src='https://lh4.googleusercontent.com/-AK3HV6AHRCc/UGWw2dTFHOI/AAAAAAAACWA/N38SkpY3dGU/s48/next.png' style='border: 0 none;vertical-align: middle;'/>

6. Change Home Page Link Find Code <data:homeMsg/> and Replace with Below Code.

<img src='https://lh5.googleusercontent.com/-daTJT5auMGs/UGXB6rHJp1I/AAAAAAAACWg/vZt6XTPwCns/s45/Top.png' style='border: 0 none;vertical-align: middle;'/>

7. Click SAVE TEMPLATE buttons, and wait until your template saved. Now check blogger.

Wednesday, 19 September 2012

Remove Labels from Each Blogger Post

REMOVE LABELS FROM EACH BLOGGER POST

If you want to remove Labels from your blogger post page just follow below steps for this hack:

1. Login to Blogger with your ID.
2. Click Template.
3. Click tab Edit HTML > Proceed > Select Expand Widget Templates > Find Code ]]></b:skin>
4. Copy the code below, then paste it before ]]></b:skin>

/* —– START Remove Post-Labels —— */
.post-labels {
visibility: hidden;
display: none;
}
/* —– END Remove Post-Labels musicrootz.com —— */

5. Click SAVE TEMPLATE buttons, and wait until your template saved. Now check blogger, your labels removed from post page.

Customize Blogger Mobile Templates

MAKE YOUR BLOG MOBILE COMPATIBLE
If you want to make changes in your blogger mobile template please follow below steps:

First Login your Blogger ID >
Dashboard >
Blog >
01 - Then Template Option>
02 - Under Mobile Tab Press Setting Option >
03 - Choose Mobile Template
04 - Select Template Color with Arrow > Then Preview to see Custom Mobile Template in Popup Window.
05 - Click On: Yes. Show mobile template on mobile devices.
06 - Then Save Setting.


Image Example:

Customize Blogger Mobile Templates


Customize Blogger Mobile Templates

Now Just add ?m=1 to the URL of any Blogger blog, and you'll get a simplified version that works well on an iPhone, Android phone and probably other phones that use a browser based.
Example: http://youblogurl.blogspot.com/?m=1.

Make Your Blog Mobile Compatible

Make Your Blog Mobile Compatible

If you want make your blog smart phone friendly follow below steps:

First Login your Blogger ID >
Dashboard >
Select Blog >
01 - Then Template Option>
02 - Under Mobile Tab Press Setting Option >
03 - Click On: Yes. Show mobile template on mobile devices.
04 - Then Save Setting.

Image Example:

Make Your Blog Mobile Compatible


Make Your Blog Mobile Compatible


Now Just add ?m=1 to the URL of any Blogger blog, and you'll get a simplified version that works well on an iPhone, Android phone and probably other phones that use a browser based.
Example: http://yourblogurl.blogspot.com/?m=1.

Here Comes the Hammer: The Tech Industry&#39;s Three Crises

The next few years are going to be extremely uncomfortable, and maybe disastrous, for the tech industry. Political opposition to the big tec...